0-28V / 6A Regulated Variable Power Supply

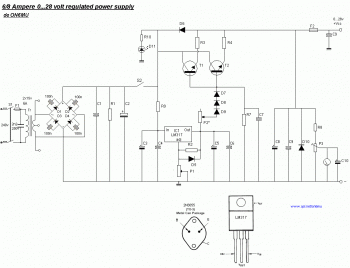
0-28V / 6A Regulated Variable Power Supply circuit diagram

Parts list:

TR = 2 x 15 volt (30volt total) 6+- amps
D1...D4 = four MR750 (MR7510) diodes (MR750 = 6 Ampere diode) or 2 x 4 1N5401 (1N5408) diodes.
F1 = 1 Amp
F2 = 10 amp
R1 = 2k2 2,5 Watt
R2 = 240 ohm
R3,R4 = 0.1 ohm 10 watt
R7 = 6k8 ohm
R8 = 10k ohm
R9 = 47 0.5 watt
R10 = 8k2
C1,C7,C9 = 47nF
C11 = 22nF
C2 = 4700uF/50v - 6800uF/50v
C3,C5 = 10uF/50v
C4,C6 = 100nF
C8 = 330uF/50v
C10 = 1uF/16v
D5 = 1N4148, 1N4448, 1N4151
D6 = 1N4001
D10 = 1N5401
D11 = LED
D7, D8, D9 = 1N4001
IC1 = LM317
T1, T2 = 2N3055
P1 = 5k
P2 = 47 Ohm or 220 Ohm 1 watt
P3 = 10k trimmer

This is definitely an simple to create power supply which has reliable, clear and regulator 0 to 28 Volt 6/8 Ampere output voltage. By using two 2N3055 transistor, you'll get two times the amount of electric current.

Although the 7815 power regulator is going to kick in on brief circuit, overload and thermal overheating, the fuses within the primary section of the transformer and also the fuse F2 in the output will protected your power supply. The rectified voltage of: 30 volt x SQR2 = 30 x 1.41 = 42.30 volt measured on C1. So all capacitors ought to be rated at 50 volts. Caution: 42 volt is the voltage that might be around the output if one of the transistors ought to blow.

P1 allows you to 'regulate' the output voltage to anything between 0 and 28 volts. The LM317 lowest voltage is 1.2 volt. To have a zero voltage around the output I've put 3 diodes D7,D8 and D9 on the output of the LM317 to the base of the 2N3055 transistors. The LM317 optimum output voltage is 30 volts, but applying the diodes D7,D8 & D9 the output voltage is approx 30v - (3x 0.6v) = 28.2volt.

Calibrate your build-in voltmeter working with P3 and, of course, a good digital voltmeter is better solution.

P2 will certainly let you to set the limit of the optimum available electric current at the output +Vcc. When using a 100 Ohm / 1 watt variable resistor the current is limited to approx. 3 Amps @ 47 Ohm and +- 1 Amp @ 100 Ohms.
Comments

Popular posts from this blog

LM317T Voltage Regulator Circuit with Pass Transistor

This is the schematic diagram of voltage regulator circuit with pass transostor. The regulator is based regulator IC of LM317T. The LM317T output current can be raised by utilizing an additional power transistor (on circuit, it is 2N2955) to share a portion of the total current. The amount of current sharing is established with a resistor placed in series with the LM317 input and a resistor placed in series with the emitter of the pass transistor. In the above scheme design , the pass transistor will start conducting when the LM317 current reaches about 1 ampere, due to the voltage drop across the 0.7 ohm resistor. Current limiting happens at about 2 amperes for the LM317 which will drop about 1.4 volts across the 0.7 ohm resistor and make a 700 millivolt drop across the 0.3 ohm emitter resistor. Thus the total current is limited to about 2+ (.7/.3) = 4.3 amperes.

6V to 12V DC Voltage Doubler

Here is the 6V to 12V DC voltage doubler circuit design, it also called DC voltage miltiplier or DC to DC converter. This dc voltage doubler circuit will need about 2A from the 6V input supply to produce the full 800mA at 12V for the power output. This circuit is very useful to generate higher voltage from a low power source, but this circuit will deliver low output current. So it should only be used for low current driven applications. Also, the output voltage may be unstable, so a voltage regulator (IC78XX) of proper rating can be used regulation and smooth output. But voltage regulator IC itself consume some current, and reduce the deliverable current.

Sealed Lead Acid (SLA) 12V Battery Charger with Current Limiting

This is the circuit design of Smart Sealed Lead Acid (SLA) 12V Battery Charger featuretwith Current Limiting. The charger uses a two step process for charging SLA batteries – a current limited ‘fast’ mode followed by a constant voltage ‘float’ mode. Maximum charging current is 1A. An onboard LED indicates when the charger is in ‘fast’ mode. When the LED goes out the battery is charged and the charger has switched to ‘float’ mode.