Lead Acid Battery Charger Schematic

Lead Acid Battery Charger Schematic


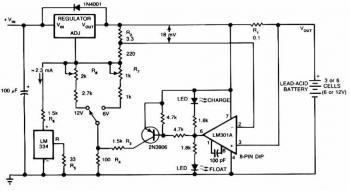
This circuit gives an initial voltage of 2.5 V per cell at 25℃ to rapidly charge the battery. The charging current decreases as the battery is charging, and when the current drops to 180 mA, the charging circuit reduces the output voltage of 2.35 V per cell, leaving the battery in a fully charged state. This lower voltage prevents the battery from overcharging, which would shorten its life.

The LM301A compares the voltage drop across R1 with an 18 mV reference set by R2. The comparator’s output controls the voltage regulator, forcing it to produce the lower float voltage when the battery-charging current, passing through R1, drops below 180 mA. The 150 mV difference in between the charge and float voltages is certainly set by the ratio of R3 to R4. The LEDs present the state of the circuit.

Temperature compensation assists stop overcharging, especially when a battery goes through wide temperature changes whilst becoming charged. The LM334 temperature sensor ought to be placed near or on the battery to lower the charging voltage by 4 mV/℃ for each cell. Because batteries require far more temperature compensation at lower temperatures, alter R5 to 30Ω for a tc of -5 mV/℃ per cell if application will see temperatures beneath -20℃.

The charger’s input voltage need to be filtered dc that's at the very least 3 V greater than the maximum required output voltage: approximately 2.5 V per cell. Choose a regulator for the highest possible current required: LM371 for 2 A, LM350 for 4 A, or LM338 for 8 A. At 25℃ and with no output load, adjust R7 for a VOUT of 7.05 V, and adjust R8 for a VOUT of 14.1V.
Comments

Popular posts from this blog

LM317T Voltage Regulator Circuit with Pass Transistor

This is the schematic diagram of voltage regulator circuit with pass transostor. The regulator is based regulator IC of LM317T. The LM317T output current can be raised by utilizing an additional power transistor (on circuit, it is 2N2955) to share a portion of the total current. The amount of current sharing is established with a resistor placed in series with the LM317 input and a resistor placed in series with the emitter of the pass transistor. In the above scheme design , the pass transistor will start conducting when the LM317 current reaches about 1 ampere, due to the voltage drop across the 0.7 ohm resistor. Current limiting happens at about 2 amperes for the LM317 which will drop about 1.4 volts across the 0.7 ohm resistor and make a 700 millivolt drop across the 0.3 ohm emitter resistor. Thus the total current is limited to about 2+ (.7/.3) = 4.3 amperes.

6V to 12V DC Voltage Doubler

Here is the 6V to 12V DC voltage doubler circuit design, it also called DC voltage miltiplier or DC to DC converter. This dc voltage doubler circuit will need about 2A from the 6V input supply to produce the full 800mA at 12V for the power output. This circuit is very useful to generate higher voltage from a low power source, but this circuit will deliver low output current. So it should only be used for low current driven applications. Also, the output voltage may be unstable, so a voltage regulator (IC78XX) of proper rating can be used regulation and smooth output. But voltage regulator IC itself consume some current, and reduce the deliverable current.

Sealed Lead Acid (SLA) 12V Battery Charger with Current Limiting

This is the circuit design of Smart Sealed Lead Acid (SLA) 12V Battery Charger featuretwith Current Limiting. The charger uses a two step process for charging SLA batteries – a current limited ‘fast’ mode followed by a constant voltage ‘float’ mode. Maximum charging current is 1A. An onboard LED indicates when the charger is in ‘fast’ mode. When the LED goes out the battery is charged and the charger has switched to ‘float’ mode.